


Stop Bread Machine Dust: Transform Your Appliance Into a Weekly Bread Hero
Got 10 minutes and a bread machine collecting dust? Here's how to turn it from kitchen counter decoration into your secret weapon for fresh, bakery-quality loaves every single week. The best part? Set it up before bed and wake to the smell of warm bread drifting through the house.
Modern bread machines have moved past the basic white loaf days. Research shows that rapid bread machine recipes can produce fresh bread in under three hours, and most standard cycles finish in about three and a half. Plus, bread stored properly in sealed containers stays fresh for several days, so a weekly bake is not just possible, it is practical.
Difficulty: Novice
Time: 10 minutes prep + 3 hours machine time
Cost: ~$3 per 2-lb loaf
Yield: One 2-lb loaf (about 12-16 slices)
What makes bread machines actually worth it
Forget everything you think you know about bread machine limits. The trick is not to let the machine do everything. Use it as the ultimate dough mixer, the part nobody wants to do, while you focus on results.
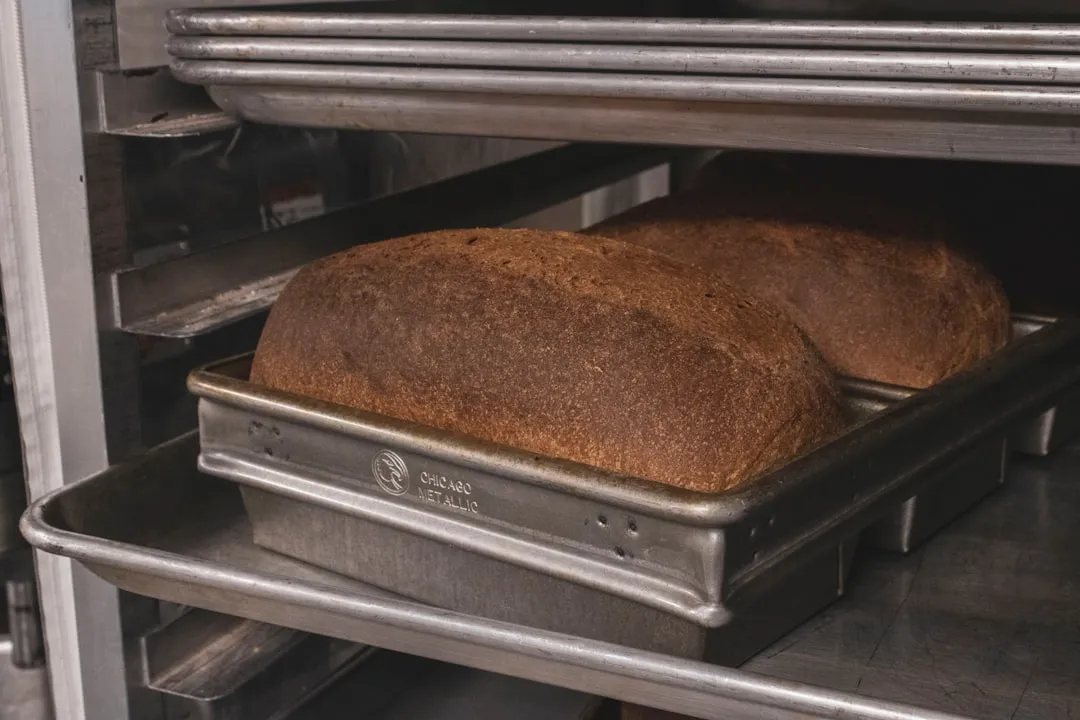
High-quality bread machines like the Zojirushi models use smart heating and steady control to produce evenly browned, nicely domed loaves instead of the pale, uneven results from cheaper machines. They also have dual kneading paddles positioned at either end of the pan, which ensures thorough mixing and proper gluten development, the difference between good bread and great bread.
That design shows up in the crust. Secondary heating elements in the lid circulate heat through the baking chamber for evenly browned, attractively domed breads. Cheaper models with wrap-around heating coils at the base often yield loaves with pale crusts and patchy browning.
Modern machines can handle up to 4-1/4 cups of flour for 2-pound loaves, and most include delayed timers so you can load ingredients before bed and wake up to fresh bread. That alone makes the investment worthwhile, imagine never running out of sandwich bread again.
The game-changing technique nobody talks about
Here's what takes bread machine results from "decent" to "amazing": use high-hydration doughs built for machine mixing. High hydration doughs create thinner, crispier crusts with more tender crumbs and ferment more quickly, which fits machine timing.
Dial in the liquid to flour ratio. A proven 2-pound recipe uses 1¾ cups warm water to 4 cups bread flour. It looks sticky and unmanageable at first, then bakes into light, airy loaves full of flavor with beautiful rise and irresistibly soft interior. Too wet? It should be.
Why this works is simple. Extra moisture steams during baking to form those nice air pockets, and the machine’s steady mixing develops gluten without overworking. The result is bread with bakery-level texture and flavor.
Want speed? Try the sourdough discard route. Quick sourdough bread machine recipes use discard plus instant yeast for instant gratification, you'll be enjoying fresh bread in mere hours instead of waiting for an overnight fermentation.
Setting up your weekly bread routine
Consistency starts with smart prep. Use high-protein flour with at least 12% protein, unbleached bread flour or quality all-purpose both work. Fresh yeast matters, use yeast that's less than six months old for reliability.
Load in this order: liquids first, dry ingredients on top, yeast last so it stays away from moisture until the knead begins. Many manufacturers recommend this liquid-first approach because mixing stays consistent.
Accuracy helps. A kitchen scale is more precise than scooping flour with a cup. No scale? Level each scoop with a knife and you will still get strong results.
Pro tip: Start with smaller loaf sizes when trying a new recipe to see how your machine handles wetter doughs. Scale up once the texture looks right.
Storage and variations that actually work
Storage makes or breaks the weekly habit. Store cooled loaves in sealed plastic bags at room temperature for 2-3 days. Freeze whole loaves for up to 3 months. Freeze slices and drop them straight in the toaster for busy mornings.
Want variety without drama? Try easy swaps. Joanna Gaines' 3-minute prep recipe uses 3/4 cup sugar for a sweet loaf, but cutting it to 1/4 cup makes everyday sandwich bread. Think tuna melts, morning toast, late-night grilled cheese.
Timing is flexible too. Most machines offer delayed timers, so you can prep Sunday night and have bread ready Monday morning, or set it before work for dinner bread. Skip delayed timers if your recipe has perishable ingredients like eggs or dairy.
What You'll Need
Materials
- 4 cups bread flour, high protein, at least 12%
- 1¾ cups warm water, 110°F/43°C
- 2 tablespoons vegetable oil
- 1½ teaspoons granulated sugar
- 1 teaspoon kosher salt
- 2 teaspoons bread machine yeast, or 2½ teaspoons active dry yeast
Tools
- Bread machine, 2-lb capacity minimum
- Kitchen scale, recommended for accuracy
- Measuring cups and spoons
- Clean kitchen towel
Safety First
- Ensure the machine is on a stable, level surface away from heat sources
- Never use a delayed timer with perishable ingredients like eggs or dairy
- Allow the machine to cool completely between uses
- Keep hands and utensils away from moving paddles during operation
Steps
-
Add liquid ingredients first. Pour warm water and vegetable oil into the bread machine pan.
- Tip: Water should feel barely warm to the touch, too hot will kill yeast, too cool slows activation.
-
Layer dry ingredients strategically. Add flour, then make small wells for sugar and for salt on opposite sides of the pan.
- Why this works: Keeping salt away from yeast at first helps prevent premature activation.
-
Add yeast last. Create a small depression in the center of the flour and add yeast, keeping it away from liquid until mixing begins.
- If using active dry yeast: Increase to 2½ teaspoons and add with the liquid ingredients instead.
-
Select your program and start. Choose "Basic" or "White" for a 2-lb loaf, medium crust.
- Tip: During the first 10 minutes of mixing, check dough consistency and scrape the sides if needed.
-
Let the machine work. Total cycle time is about 3 hours and 20 minutes.
- If checking progress: Avoid opening the lid during rising and baking.
-
Remove promptly when done. Turn the loaf out onto a cooling rack right away to avoid a soggy bottom crust.
- Important: Remove kneading paddles from the finished loaf while it is still warm.
Cleanup & Disposal
- Remove and wash kneading paddles immediately after each use to prevent sticking
- Wipe the pan with a damp cloth, avoid abrasive cleaners that damage the nonstick coating
- Store leftover ingredients in airtight containers, yeast keeps best refrigerated
Troubleshooting
Problem: Dense, heavy loaf → Fix: Check yeast freshness; ensure proper liquid temperature; verify flour protein content
Problem: Loaf doesn't rise → Fix: Test yeast viability in warm water; check expiration dates; avoid salt-yeast contact during loading
Problem: Pale, uneven crust → Fix: Select a darker crust setting; ensure the machine has adequate ventilation; consider upgrading to a dual-element machine
Variations & Upgrades
- Sourdough version: Replace 1 cup flour and ½ cup water with 1 cup sourdough discard; add 1 teaspoon instant yeast for quicker results
- Whole grain option: Substitute up to 1 cup bread flour with whole wheat flour; add 1-2 tablespoons extra liquid
- Herb bread: Add 2 tablespoons dried herbs, rosemary, thyme, oregano, with the dry ingredients
Your bread machine breakthrough starts now
The difference between bread machine success and failure is not the machine, it is understanding how to work with it. Quality machines with dual paddles and proper heating elements deliver consistent results, and proper ingredient ratios and loading techniques make each loaf meet bakery standards.
Starting with simple recipes and proper technique builds confidence before you try complex variations. Once you nail the basics, the aroma of fresh bread adds incalculable joy to the week. And your grocery budget will breathe a sigh of relief.
Ready to transform that dusty appliance into your favorite kitchen tool? Load the ingredients tonight and wake up to the smell of success tomorrow morning.


Comments
Be the first, drop a comment!