


For those of us without rice cookers, conventional wisdom tells us that the stove is our only real option (unless, of course, you dabble in microwavable rice). However, if you're only using the stove for cooking rice start-to-finish, you're missing out on the easiest way to make perfect rice every time.
First, think about the traditional way to cook rice on the stove.
You boil water and add your rice (perhaps some butter and salt, as well). When the water boils again, cover the pot and simmer it for about 15 minutes for white rice or 45 minutes for brown, give or take. When the timer stops, you take the pot off the heat and let it sit for another 10 minutes or so, careful not to lift the lid until the rice has had a chance to soak up all that steam.
But once you lift the lid, what usually happens? Sure, you fluff the rice with a fork, serve it out, and everything seems great. Until, of course, you reach the bottom of the pot where a layer of overcooked, hard rice rests, waiting for you to scrape it off into someone's plate or directly into the trash. Delicious.
Luckily, there's a way to avoid the simmering, resting, and crusted layer of gunk: use your oven. Yep, your oven is the rice cooker you never knew you had.

My first experience cooking rice in the oven came from a Binging with Babish video. He casually mentions the technique when explaining how to make fried rice at home (which requires old white rice, FYI). Because of that, my instructions are based on his, but feel free to experiment with your own timing and temperature if you want.
While there isn't much information about why cooking rice in the oven is better than on the stove, it's easy to guess based on common logic. When you cook on the stove, all the heat source is focused on the pot's bottom. While most of the pot gets to cook from the simmer and the steam, the bottom layer of your rice gets that concentrated heat blast, causing it to stick to the bottom of the pot and become gross.
We don't have that problem in the oven. While it's true that the heat source on some ovens is on the bottom of the unit, it isn't directly focused on the bottom of your pot. Instead, the pot is heated all over, allowing the oven-baked rice to cook slowly and evenly.
Oven-cooked rice
Start to finish: 20 minutes to 1 hour.
Servings: 4
1.5 to 2 cups water (based on preference)
Pinch of salt
Small scoop of butter (optional)
Fine-mesh strainer (optional)
Choose your rice
Let's establish what we're working with here. If you're like me, you make a lot of dishes with white or long-grain rice, like jasmine. That's the rice I used when discovering this technique for the first time. If you like brown rice, there are a couple of things to consider. For example, you don't need to rinse brown rice, but you do need to cook it much longer than white rice. We'll dive into that below.

Preheat your oven to 375°F
Easy enough. Just know this is 375ºF for a standard oven, not a convection oven. Also, did you know that you can use your smartphone to start the initial preheating with some ovens? For example, GE, LG, Samsung, and other appliance manufacturers have smart ovens that work with companion Android and iOS apps.
Recommended Smart Oven: GE C2S950P2MS1 Cafe 30 inch Smart Double-Oven Range With Convection Bundle ($3,399)
Prepare and rinse your rice
I usually cook for two, so I typically measure out one cup of uncooked jasmine rice, which yields about three cups of cooked rice.
You don't have to rinse your white rice, but I like to. It washes away the excess starches that would otherwise make the rice very sticky. If you prefer that style, feel free to skip this step, but I like how rinsing the rice makes it fluffier.
For those using brown rice, you could skip rinsing or do it just once, real quick, to remove unwanted debris. It's still a hotly debated topic. Brown rice still has its hull, so there's less powdery residue to worry about. Sometimes, rinsing brown rice can make it mushy, but some say that it tastes better rinsed and even increases its taste and nutritional content.
You can rinse your rice in a pot or use a strainer to avoid spilling the rice as you drain. Either way, you'll want to rinse the white rice until the water appears clear, or about three times through if using the pot, but only rinse a maximum of one time for brown rice.

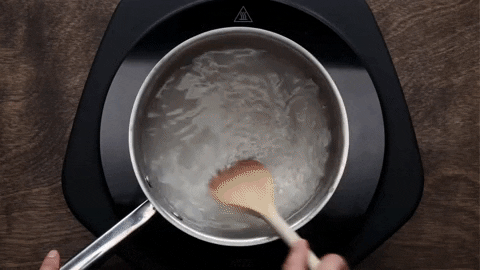
Boil water and add your rice
Now, a point of contention: Do you boil your water before or after adding your rice? Some say the former; others say the latter. I personally add the rice to the cold water and then boil it all together, but the choice is really yours.
The same goes for the amount of water you use. Some packaging recommends using two parts of water for every one part of rice. In my example, I'm using 1 cup of rice, which would equal about two cups of water in the pot. I prefer to use water at about 1.5 times the amount of rice, which means 1.5 cups of water.
Like rinsing the rice, the amount of water you use determines how fluffy or sticky it will be. The more water you use, the stickier and creamier your rice will become.
If you want to add a small amount of butter for flavoring, feel free to do that now. Otherwise, fire up your stove, put the pot on, and wait for the water and rice to boil. If you add the rice ahead of time, you'll wait for it to boil for the first time. If you add rice to boiling water, you'll wait for the water to boil again.
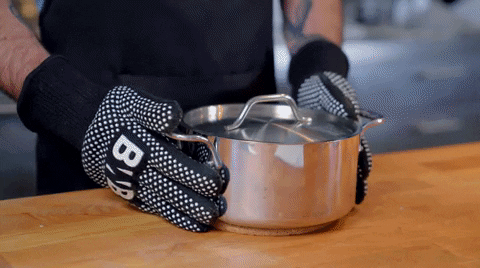
Add salt, stir it, cover the pot, and put it in the oven.
Bake in the oven
Leave your rice in the oven for 20–25 minutes. I find that 20 is just fine for cooking this amount of white jasmine rice, at least in my oven. For brown rice, try letting it stay in for closer to an hour. This process combines the two steps of cooking rice on the stove (simmering and resting), so it does stay in the oven longer than you'd normally keep the burner on.

Fluff it up and enjoy!
Using oven mittens, of course, remove the pot from the oven, then remove the lid. Once the cloud of steam clears, fluff the rice up with a fork, then serve. You should find the rice fluffier than you've ever seen it over the stove. If you went with sticky rice, it should only stick to itself, not the pot. All the rice on the bottom of the pot should also resemble the rest of the batch — no goop or crunch in the mix. Enjoy!
Babish Culinary Universe/YouTube
Don't Miss: The Secrets to Giving Day-Old French Fries a Delicious Second Life
Cover photo by Pille-Riin Priske/Unsplash.


Comments
Be the first, drop a comment!