



Why dull knives are dangerous comes down to physics, not carelessness: a blade that can't bite cleanly into food forces you to push harder, and that extra force is exactly what sends the edge skidding off a tomato skin or an onion layer and into your hand.
A dull blade "requires more pressure to cut into a food, and can easily slip off of a tough onion skin and into your finger." OHSE has documented the same failure point in working kitchens: a prep cook using a blunt knife has to press down harder to get through the food, and when the blade slips, it lands in the hand holding the food steady, not on the cutting board.
A sharp edge does the opposite job with far less effort. It slices instead of crushing, so you're guiding it with light, steady pressure rather than forcing it through. That's the real case for keeping a knife sharp: not a cleaner cut for its own sake, but staying in control of the blade the whole time it's moving.
This guide walks through how to tell whether a knife has actually gone dull, which knives are safe to sharpen at home versus which ones need a specialist, a full whetstone routine, and the daily habits that keep an edge from dulling as fast. None of it requires professional training, and it's beginner-friendly work that gets easier after a few practice sessions.
Are dull knives really more dangerous than sharp ones?
Yes, and both food-service safety research and kitchen testing point the same direction. The extra force a dull blade demands is what turns a controlled slice into a slip, a pattern OHSE has documented in working kitchens and one Serious Eats has found in its own testing.
Some corroborating numbers come from outside the kitchen. A blade manufacturer's safety summary cites a National Safety Council finding that blunt blades are linked to roughly 40% more workplace accidents than sharp ones, and an ergonomics study it references found sharp blades need about 60% less overall cutting force.
Treat those figures as directional rather than a home-kitchen statistic. The underlying research covers industrial cutting tasks like cardboard, film, and strapping, not chef's knives on produce, but the pattern lines up with what OHSE and Serious Eats found in actual kitchens.
How to tell if a kitchen knife is dull
Skip the classic paper test. A knife that's already losing its edge will often still slice a sheet of paper cleanly, then struggle the moment it meets a tomato or an onion, according to Serious Eats. Paper doesn't tell you what the knife will actually do with real food.
The reliable check is to use the knife on food. Slice a ripe tomato or dice an onion. A sharp blade glides through the skin with light pressure and produces clean slices, while a dull one squashes the tomato instead of cutting it, tears through onion layers, or needs you to lean into it to finish the cut.
What you'll need
A double-bevel knife suited to home sharpening: a chef's knife, santoku, or paring knife
A medium-grit whetstone, around 800 grit, for the initial edge
A fine-grit whetstone, 2,000 grit or higher, to refine that edge
A non-slip base or a folded damp towel to keep the stone from moving
A clean towel to wipe the blade between passes
A honing steel for upkeep between full sharpenings
A stone fixer is worth owning, but it's optional gear for flattening a stone once it develops grooves, not something a first sharpening session requires.
Not every stone needs a soak before use. Waterstones should be submerged in water for at least 45 minutes, or per the manufacturer's instructions, before you start. Oil stones, diamond plates, and some combination stones are handled differently, so check what came with yours before assuming a soak is required.
Which knives are safe to sharpen at home
Standard double-bevel knives, chef's knives, santokus, and paring knives are good candidates for the whetstone routine below. Other knife types need their own instructions, and if you can't confirm the correct method for yours, take it to a specialist instead of guessing.
Single-bevel Japanese blades are a different category from double-bevel Western knives. Serious Eats treated them separately in its own testing rather than running them through the same whetstone process, so follow the manufacturer's instructions for a single-bevel knife, or find someone who specializes in them.
Ceramic blades are a different material from steel. Some sharpening systems offer stone types built specifically for ceramic and diamond work. Check what the manufacturer recommends before running a ceramic edge over a standard steel-sharpening stone.
Serrated bread knives need their own maintenance approach rather than the flat-edge whetstone routine covered here. A knife that's visibly chipped, has a bent tip, or has a loose or cracked handle isn't a good fit for a first attempt at home sharpening either. A professional sharpener can tell you whether it's salvageable or whether it's time to replace the knife.
Choosing a sharpening method
A whetstone is the best method for home sharpening, according to Serious Eats: it produces the strongest edge and removes the least material from the blade, though it takes practice to hold a steady angle. Most home cooks should plan on sharpening at least twice a year, more often with daily use.
A guided electric sharpener is the middle option. Serious Eats tested one unit that was straightforward to set up and use and improved measured sharpness by at least 30% across several knives, but it didn't restore factory-level sharpness and struggled with blade heels and larger blades like cleavers.
Pull-through and manual electric sharpeners are best avoided for regular use because they shear off more metal than a stone pass does, which shortens a knife's working life over time. A professional sharpener is a better fallback for anyone not ready to learn stone technique. Expect a first whetstone attempt to feel slow and a little unfamiliar; success looks like a knife that slices a tomato or onion with light pressure, not a mirror-polish finish.
How to sharpen a kitchen knife safely on a whetstone
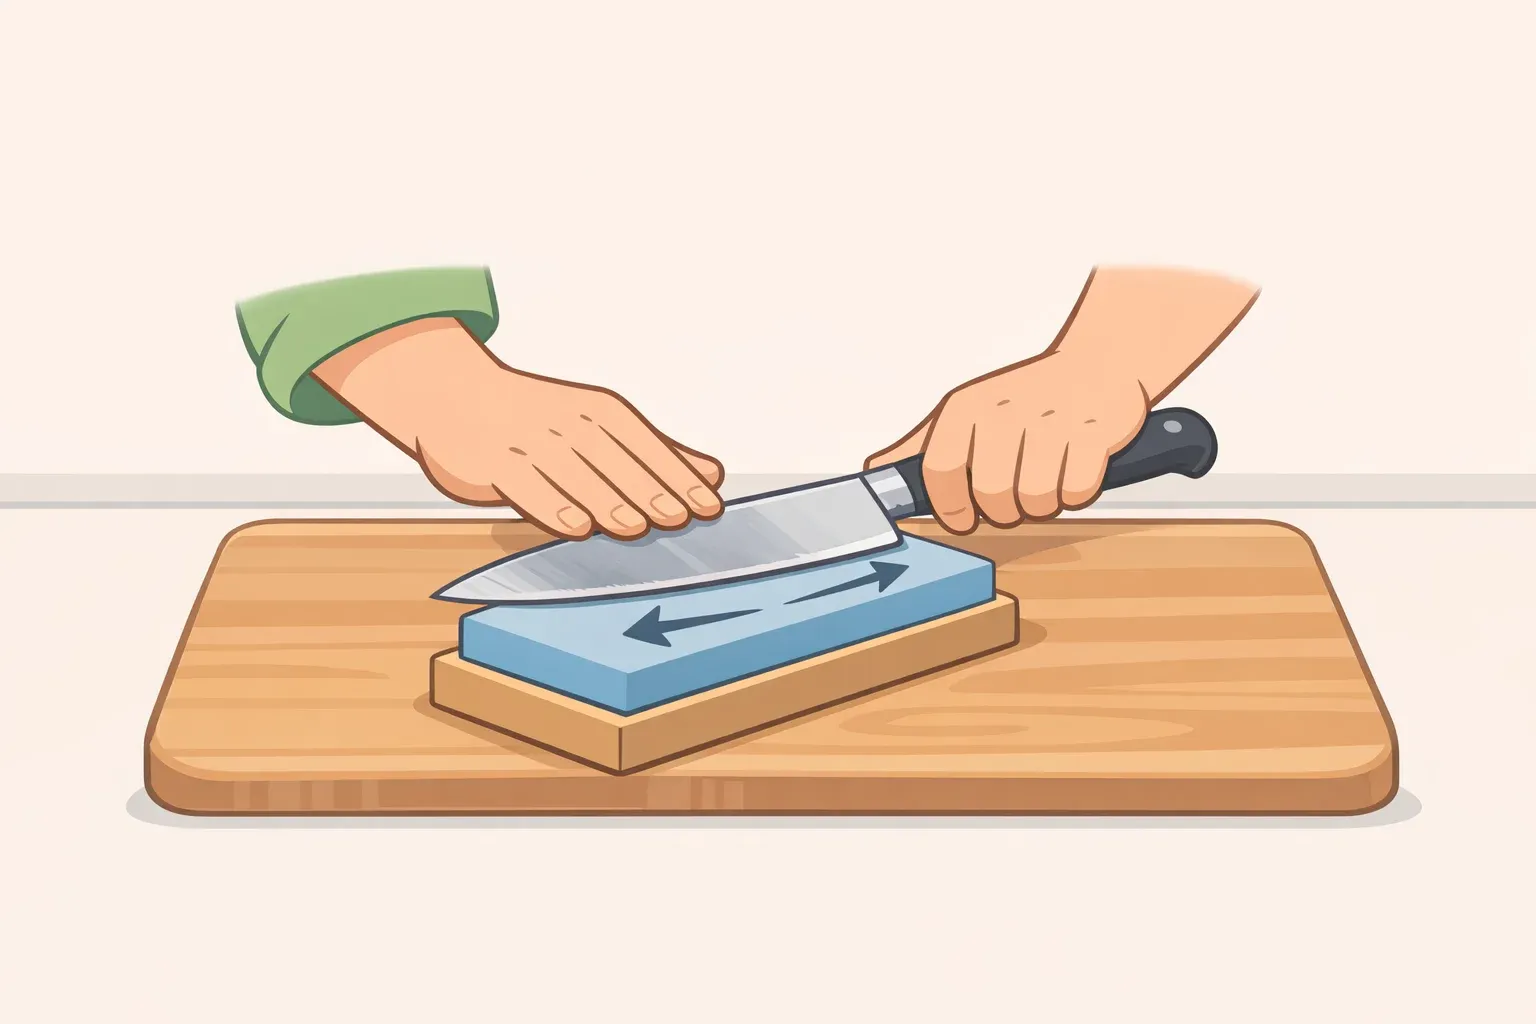
Set the stone on a damp towel or a non-slip base on a clear, dry counter so it can't shift mid-stroke. If it still moves under pressure, fold another towel underneath until it sits firm. Keep the edge angled away from your fingers the entire time, and lift the knife clear of the stone to reset your stroke rather than dragging it backward across the surface.
Start with the medium-grit stone. Hold the blade at a 15 to 20 degree angle against the stone, keeping the fingers of your guiding hand flat against the spine, not wrapped around the edge. Draw the blade toward you down the length of the stone in one smooth stroke, following the curve of the blade so contact moves from heel to tip as the stroke finishes, then lift the knife off the stone before starting the next pass.
Watch for the burr on the side you're not working. After roughly 30 to 40 strokes on one side, a small burr, a slightly raised ridge of metal, forms along the edge on the opposite face of the blade. Check for it by running a finger from the spine toward the edge, not along the edge itself; that burr means the side facing the stone is done, and it's time to flip the knife. Thirty to 40 strokes is a starting estimate, since some knives raise a burr sooner and some take longer.
Sharpen the second side. Repeat the same angle and stroke count on the other face until a burr forms along that first edge again, this time facing the opposite direction. That's the sign both sides are evenly sharpened.
Move to the fine-grit stone. Using the same 15 to 20 degree angle, work each side again with lighter pressure than you used on the medium stone. This step refines the edge you already built rather than raising a new burr, so 10 to 15 light strokes per side is usually enough.
Test on food, not paper. Slice a tomato or dice an onion. Light pressure and a clean cut mean you're done.
Honing is a separate step from this process, not part of the numbered sequence above. A honing steel realigns an edge that's already sharp; it doesn't remove material or rebuild a blunt edge the way a whetstone does. Use it as regular maintenance before or after cooking, not as a stand-in for the routine you just finished.
Once you're done, rinse the blade clean of any grit residue and dry it. Dry the stone too, and let it sit on a rack for at least a day before storing it wrapped in a towel, away from oil or grease. If the stone develops visible grooves after repeated use, flatten it with a stone fixer before your next session, since an uneven surface produces an uneven edge.
Common mistakes
Treating honing and sharpening as the same step. Honing realigns an edge that's already there; sharpening removes material to rebuild one that's gone.
Skipping the stone soak on a waterstone. Using one dry wears it out faster over time.
Reaching for a pull-through sharpener as a default. It shears off more metal than a stone pass and shortens the knife's life.
Continuing to grind on a chipped or warped blade. Stop and take it to a professional instead of pushing through at home.
Troubleshooting a whetstone sharpening session
No burr after 40-plus strokes. Check your angle first; too shallow an angle won't raise a burr no matter how many passes you make. Confirm you're holding 15 to 20 degrees and pressing firmly but not forcing the blade into the stone.
Burr forms only near the heel or tip. That usually points to uneven pressure through the stroke. Slow down and make sure the whole length of the blade, not just one section, is contacting the stone as you pull it through.
Knife still crushes food after sharpening. Try honing first, since the edge may just be misaligned rather than actually dull. If honing doesn't fix it, the edge likely needs more time on the stone, or the bevel angle wasn't consistent through the strokes.
Stone rocks, dishes, or has visible grooves. A rocking stone needs a firmer base underneath it. A dished or grooved surface needs a stone fixer before your next session, since an uneven stone produces an uneven edge.
Not sure about your knife's bevel or stone type. Check the documentation that came with the knife and the stone before proceeding. When in doubt, a professional sharpener can confirm what you're actually working with.
Dull knife safety: habits that keep the edge sharp between sharpenings
Sharpening isn't a one-time fix. What you do with a knife between sharpenings decides how often you actually need to repeat the steps above.
Clean the knife separately from other dishes rather than dropping it into a sink of suds, where it's hidden and easy to grab by the wrong end. Store it in a rack, strip, or block instead of loose in a drawer.
Use a claw grip with your guiding hand during prep, curling fingertips under and using your knuckles as a guide for the blade. Carry a knife pointed down at your side, never waving it around, and if it starts to fall, let it fall; reaching for a falling blade turns a minor mistake into a real injury.
Hone on a steel regularly as routine maintenance between full sharpenings. It keeps the edge aligned longer, which means fewer trips to the whetstone overall.
When to hone, sharpen, or call it done
Next time a knife feels off mid-prep, let the cut itself decide what it needs. If it still bites into a tomato but feels slightly less crisp than usual, the edge may just be misaligned rather than dull, and a few passes on a honing steel can often bring it back.
If honing doesn't help and the knife still crushes or skids on a tomato or onion, it needs a real sharpening, whether that's a whetstone, a guided sharpener, or a professional. If the blade is visibly chipped, bent, cracked, or the handle has come loose, that's beyond a home fix. Get it to a professional or replace it.
Either way, test with the same check you started with: slice a tomato or dice an onion. A knife that glides through with light, steady pressure is ready to go back in the block. Put a full sharpening on the calendar on a schedule that matches how hard the knife works, at least twice a year for most home cooks, more often for one used daily.



Comments
Be the first, drop a comment!