



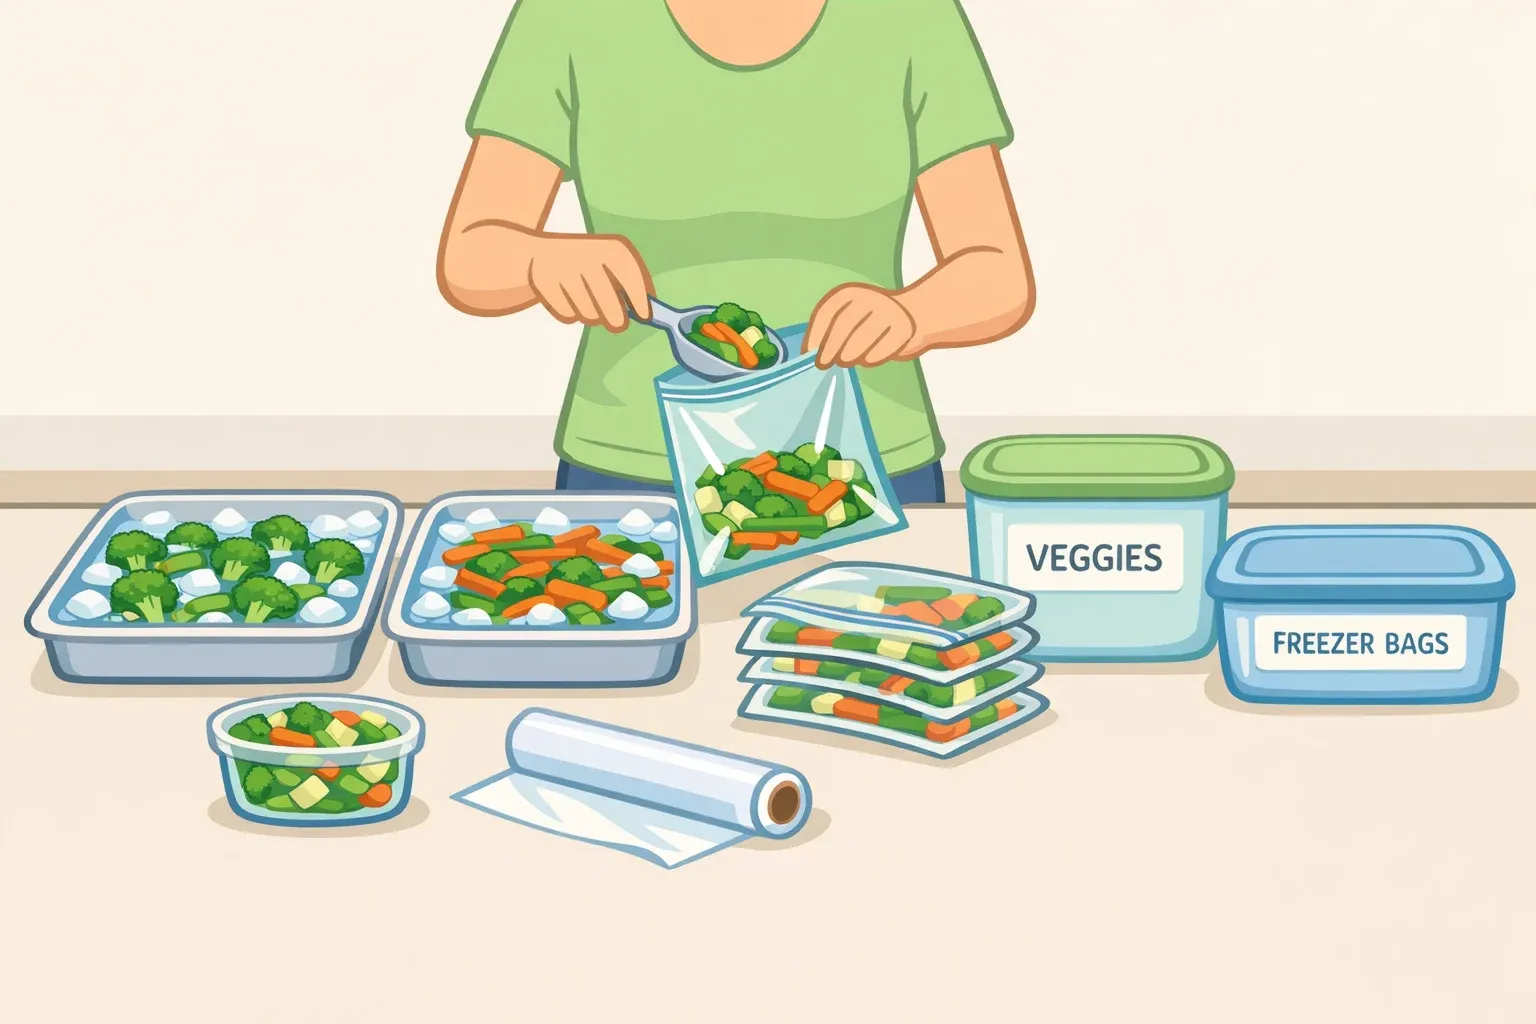
Most vegetables need more than a freezer bag and a label. Blanching them first helps preserve their color, flavor, and texture so they are ready for soups, stir-fries, grain bowls, and quick side dishes.
Briefly boiling or steaming vegetables slows the enzyme activity that continues to affect their quality after harvest. The National Center for Home Food Preservation recommends blanching almost all vegetables before freezing. Using the wrong blanching time can leave vegetables dull, soft, or unpleasant after thawing.
Freezing vegetables in ready-to-cook portions can also reduce food waste, preserve seasonal produce at peak quality, and make weeknight meals easier to assemble. Here is how to do it correctly.
Which vegetables freeze well?
Broccoli, cauliflower, green beans, peas, spinach, kale, carrots, corn, and broad beans generally freeze well when blanched for the correct amount of time.
Winter squash and sweet potatoes also freeze well, but they should be cooked before freezing rather than briefly blanched. Raw potatoes may become discolored or develop an unpleasant texture, so they also produce better results when partially or fully cooked first.
Vegetables with high water content usually lose their crispness after freezing. Ice crystals damage their cell walls, which can make tomatoes, cucumbers, salad greens, and celery soft or watery after thawing.
That does not make all of them unusable. Tomatoes can be frozen for sauces, soups, stews, and chili, where their softer texture will not be a problem. Cucumbers and salad greens are poor candidates when you plan to serve them raw.
Some vegetables do not need to be blanched. UNH Extension notes that chopped onions, green onions, leeks, and peppers can be frozen raw when they will later be used in cooked dishes. They will soften in the freezer, so they are not good substitutes for fresh vegetables in salads or garnishes.
Peas and corn are forgiving choices for beginners because the texture changes caused by freezing are usually less noticeable in starchier vegetables.
How to blanch and freeze vegetables
You will need:
A large pot with a lid
A blanching basket, wire basket, or slotted spoon
A large bowl filled with ice water
One or more baking trays
Clean kitchen towels or a salad spinner
Freezer-grade bags or freezer-safe containers
A timer
A permanent marker or freezer labels
1. Start with fresh vegetables
Freezing preserves the quality vegetables already have; it does not restore produce that has become slimy, badly wilted, moldy, or spoiled.
Wash the vegetables thoroughly and remove any damaged areas. Cut everything into pieces of a similar size so they blanch and cook at the same rate.
Cut broccoli into florets about 1½ inches across and cauliflower into florets about 1 inch across. Slice or dice carrots into evenly sized pieces. Trim green beans and shell fresh peas.
Prepare only as much as you can blanch, cool, dry, and freeze promptly.
2. Prepare the boiling water and ice bath
Use about 1 gallon of water for every pound of prepared vegetables. Leafy greens need approximately 2 gallons per pound.
Bring the water to a vigorous boil. While it heats, fill a separate bowl with cold water and plenty of ice. The ice bath must be ready before the vegetables go into the pot because they need to be cooled immediately after blanching.
Do not add the vegetables before the water reaches a full boil.
3. Blanch for the recommended time
Place a manageable amount of vegetables in the boiling water and cover the pot. Start the timer when the water returns to a boil.
If the water does not begin boiling again within one minute, the batch is too large. Remove some of the vegetables or use more water.
Use these tested water-blanching times for the specified vegetable sizes:
Water-blanching times
Broccoli
Preparation: Florets about 1½ inches across
Blanching time: 3 minutes
Cauliflower
Preparation: Florets about 1 inch across
Blanching time: 3 minutes
Green beans
Preparation: Trimmed or cut
Blanching time: 3 minutes
Carrots
Preparation: Diced or sliced
Blanching time: 2 minutes
Spinach and most leafy greens
Preparation: Washed with tough stems removed
Blanching time: 2 minutes
Green peas
Preparation: Shelled
Blanching time: 1½ minutes
Whole-kernel corn
Preparation: Blanch on the cob, then cut off the kernels
Blanching time: 4 minutes
These times apply to water blanching. Steam-blanching times may be longer.
Follow the recommended time for the specific vegetable and piece size. Under-blanching can increase enzyme activity, while over-blanching can reduce flavor, color, and nutrients.
4. Cool the vegetables immediately
Transfer the vegetables directly from the boiling water to the ice bath. Stir them several times so they cool evenly.
For most vegetables, the cooling time should be about the same as the blanching time. According to UNH Extension's freezing instructions, corn blanched on the cob should cool for about twice its blanching time before the kernels are removed.
Add more ice if the water begins to warm. Cooling stops the cooking process and helps prevent the vegetables from becoming overly soft.
5. Drain and dry thoroughly
Remove the vegetables from the ice bath and drain them well. Pat them dry with clean towels or use a salad spinner for firm vegetables.
Water left on the surface becomes additional ice during freezing, which can cause clumping and reduce texture quality.
6. Tray-freeze the vegetables
Arrange the dry vegetables in a single, uncrowded layer on a lined baking tray. Place the tray in the freezer until the pieces are solid.
Transfer them to bags or containers as soon as they are frozen. This tray-pack method keeps the pieces separate, allowing you to remove only the amount needed for a meal.
A thin layer also freezes faster than a large clump. Clemson Cooperative Extension explains that rapid freezing produces smaller ice crystals, which cause less damage to plant cell walls than the larger crystals formed during slow freezing.
7. Package, label, and store
Transfer the frozen vegetables to freezer-grade bags or rigid freezer-safe containers. Divide them into amounts you are likely to use at one time.
Press as much air as possible out of freezer bags before sealing them. Air exposure contributes to freezer burn, which can leave vegetables dry, discolored, and less flavorful.
Label every package with:
The vegetable
The amount or portion size
The freezing date
An intended use, if helpful
For example:
Broccoli — 1 cup — stir-fry — July 2026
Store the packages at 0°F, or -18°C, or below. Properly prepared vegetables maintain their best quality for approximately eight to 12 months at that temperature.
Food kept continuously frozen at 0°F can remain safe beyond that period, but its color, flavor, and texture will gradually decline. The USDA explains that recommended freezer-storage times concern quality, not an automatic safety deadline.
Do not crowd the freezer with large quantities of unfrozen food. Arrange newly filled packages in a single layer with space between them until they freeze solid, then stack them to save space.
How to cook frozen vegetables
Most blanched vegetables can be cooked directly from frozen. Thawing them first may release water and make them softer.
Soups and stews
Add frozen vegetables directly to simmering soup or stew. Continue cooking until they are heated through and reach the texture you prefer.
Leafy greens, peas, corn, carrots, cauliflower, and green beans all work well in broth-based soups and stews.
Stir-fries
Add small portions of frozen vegetables to a hot pan without thawing them. Avoid adding a large frozen block, which can quickly lower the temperature of the pan.
Let the released moisture cook away before adding sauce. Because the vegetables were partially cooked during blanching, they may need less time than fresh vegetables.
Steaming
Place the vegetables in a steamer while still frozen and cook until heated through. Check them frequently to prevent overcooking.
Roasting
Frozen vegetables can be roasted, although excess moisture may prevent browning. Spread them on a preheated tray without crowding and roast at a high temperature.
Vegetables such as broccoli and cauliflower generally roast better from frozen than leafy greens.
Casseroles, curries, and pasta dishes
Add frozen vegetables directly when the dish has enough cooking time remaining to heat them through. Reduce other liquids slightly if the vegetables are likely to release water.
Frozen spinach should usually be thawed and squeezed dry before it is added to fillings, dips, egg dishes, or recipes in which excess moisture could affect the result.
Build different meals from one batch
Freeze vegetables as flexible ingredients rather than complete meals. A small freezer supply can support several dinners without requiring you to eat the same dish repeatedly.
Grain bowl: Serve steamed broccoli and carrots over rice, quinoa, or another grain, then add peanut, tahini, or miso sauce.
Stir-fry: Cook green beans and corn in a hot pan, then add garlic, soy sauce, and noodles or rice.
Soup: Add peas, cauliflower, and leafy greens to simmering stock with canned beans and seasonings.
Pasta: Stir peas, spinach, or broccoli into pasta sauce shortly before serving.
Quick side: Steam a single portion and finish it with olive oil, lemon juice, herbs, or seasonings.
Because the vegetables are frozen separately, you can combine them differently for each meal.
Try a simple first batch
Start with fresh broccoli, green beans, and shelling peas. Choose two of the three if fresh peas are unavailable.
These vegetables have short blanching times and work in several kinds of meals.
Suggested portions for a first batch
Broccoli florets
Blanching time: 3 minutes
Suggested portion: 1 cup
Best uses: Bowls, stir-fries, and side dishes
Green beans
Blanching time: 3 minutes
Suggested portion: 1 cup
Best uses: Stir-fries, soups, and side dishes
Shelled green peas
Blanching time: 1½ minutes
Suggested portion: ½ cup
Best uses: Soups, bowls, and pasta dishes
Blanch one vegetable at a time, allowing the water to return to a full boil between batches. Refresh the ice bath whenever it begins to warm.
Spread each vegetable in a single layer on one or more trays. Once the pieces are frozen solid, package them in portions and return them to the freezer.
Start with vegetables you already buy and cook regularly. Freezing unfamiliar ingredients is unlikely to make meal preparation easier.
Use the oldest packages first
Frozen vegetables lose quality gradually, even when they have been blanched, packaged, and stored correctly.
Place newer packages behind older ones so the oldest vegetables are used first. Freezer burn does not automatically make frozen food unsafe, but badly dried-out vegetables may no longer be worth keeping.
With the correct blanching time, a cold ice bath, thorough drying, and airtight packaging, fresh vegetables can become useful, ready-to-cook ingredients instead of forgotten produce at the bottom of the refrigerator.









Comments
Be the first, drop a comment!