



Most expensive steak disappointments trace back to three mistakes: uneven heat, too much handling, and no thermometer. Michelin-starred chef José Andrés and Food Network "Master of Cue" champion Erica Blaire Roby flagged those exact errors independently.
The five decisions below are what separate a properly cooked steak from an overpriced one: heat zone setup, seasoning and fridge timing, thickness-based cooking method, thermometer use and pull temperature, and restraint. Work through them in order.
This guide covers whole beef steaks only. Ground beef, poultry, and other cuts follow different rules.
On temperatures: The USDA sets the safe minimum internal temperature for whole beef cuts at 145°F, followed by a 3-minute rest. Chefs and pitmasters typically target medium-rare at a final 130–135°F, which falls below that threshold. Both figures appear in this guide, clearly labeled. Use separate plates and utensils for raw and cooked meat.
Step 1: When to take steak out of the fridge before grilling and how to season it
Two decisions happen before the grill turns on: how to salt the steak, and how long it sits out. Get either wrong and the cooking steps become harder to control.
On seasoning, Roby's baseline is a generous coat of salt and pepper, applied more heavily than feels intuitive on thicker cuts so the seasoning actually penetrates past the surface, per Eat This, Not That!. Andrés takes the opposite approach: no salt before the grill, just a finish of flaky crystals after the steak comes off. The meat tastes clean at first bite, then the salt crunches in. "Simplicity wins the day," he says, with the steak's own juices serving as the sauce. Both methods work. The error in either direction is using too little salt.
If using a heavily salted rub, let the steak rest 20–30 minutes after seasoning, then pat the surface completely dry before it hits the grate. The same applies to wet marinades. Surface moisture steams the meat instead of searing it.
The fridge timing question is where the chef and food-safety guidance split. Andrés recommends pulling the steak one to three hours before grilling, especially for large cuts. Tempered meat browns better and cooks more evenly. Blakeslee draws the line at about 30 minutes: letting raw meat sit for hours allows bacteria to multiply in ways that cooking may not fully eliminate. Thirty minutes is the safer default; the food-safety guidance is clear on this. Andrés's preference is worth knowing, but this guide follows the science.
Step 2: Set up a two-zone fire before anything touches the grate
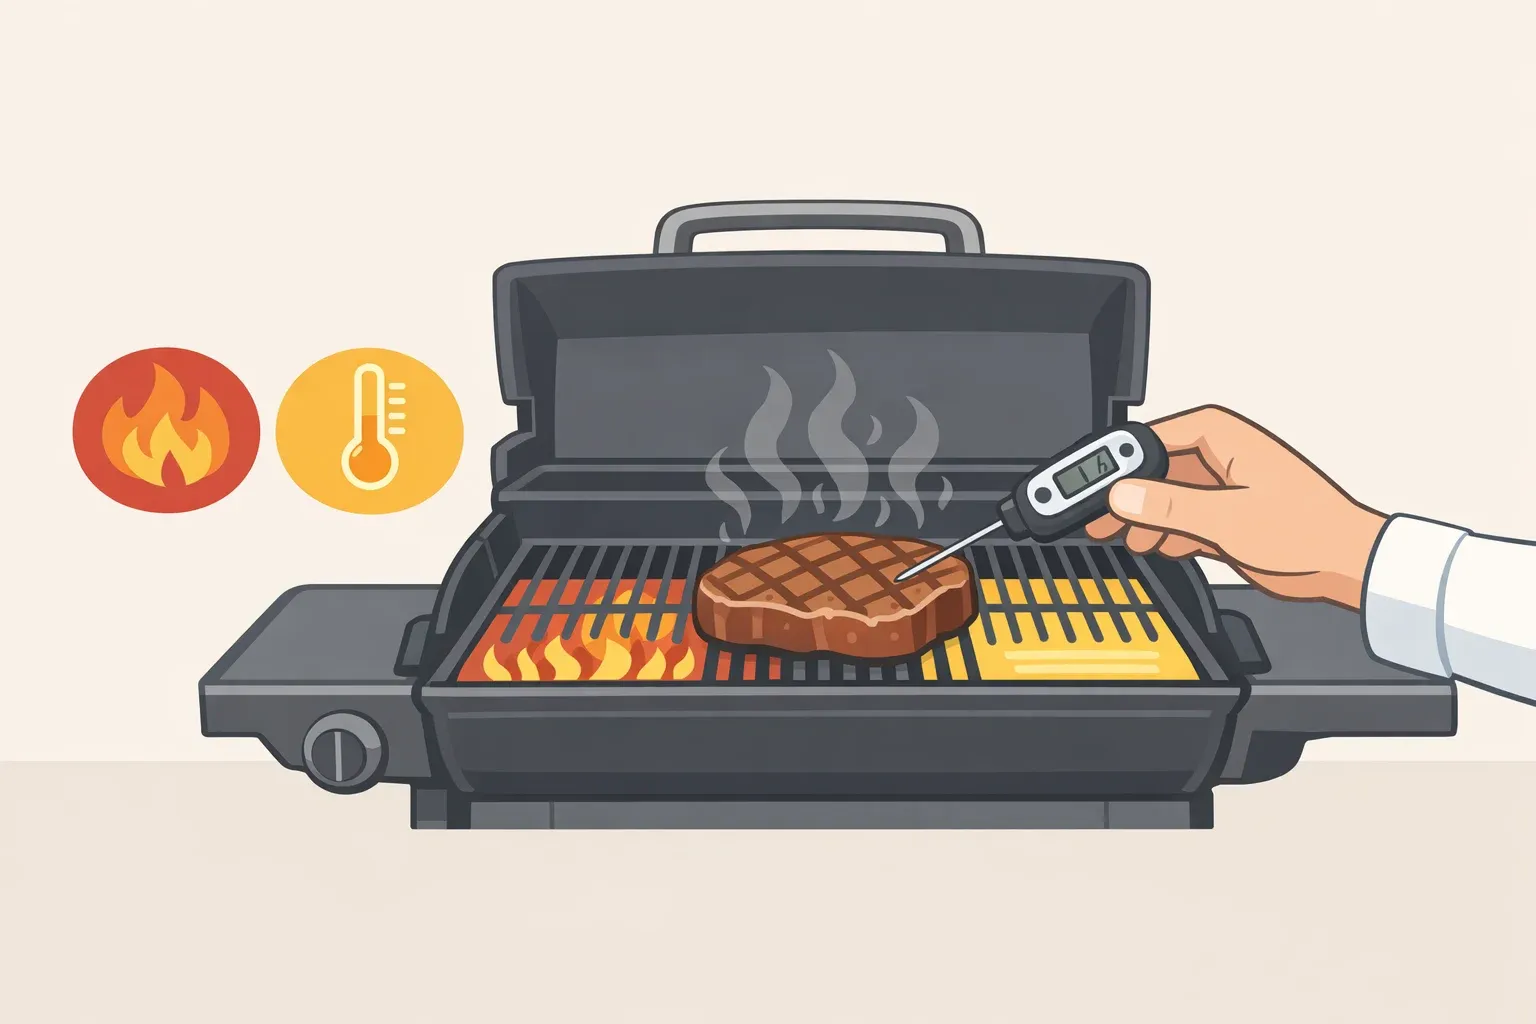
A grill running uniformly hot produces charred exteriors and undercooked centers. The fix is one hot zone for searing and one cool zone for finishing and flare-up recovery. Both need to exist before the steak goes on.
Roby's method is to sear on direct heat, then shift to indirect to finish. Andrés arrives at the same setup from a different angle: keep the sides hot, leave the center unlit, and when drippings trigger a flare-up, move the steak immediately to the cool zone. Two chefs with different styles, same configuration.
The chemistry: the Maillard reaction, which builds the crust and most of the flavor, begins when the steak's surface reaches roughly 285–325°F. High initial heat gets there fast. The cool zone prevents the crust from tipping into char once it's formed.
Gas grill: Preheat all burners to 450°F for 10–15 minutes. Then turn off one or two burners completely before placing the steak. The live side is the sear zone; the off side is the escape and finishing zone.
Charcoal grill: Arrange lit coals in a pile on one half of the kettle. Leave the other half empty. Sear directly over the coals; shift to the coal-free side if flare-ups start or to finish a thick cut.
If flare-ups ignite on a uniformly hot grill, there's nowhere to go; the steak will overchar before it finishes cooking. The cool zone has to come first.
Step 3: How to grill steak based on thickness
Thickness is the single biggest variable in cook time. It also determines which method to use. Know this number before the steak leaves the counter.
Under 1¼ inches: Direct heat throughout. Sear on the hot zone, flip once, pull at target temperature. For a 1-inch steak targeting medium-rare at 450°F, that's roughly 5 minutes on the first side and 4–5 on the second. Adjust by about 1–2 minutes per side for each additional half-inch of thickness.
1¼ to 1½ inches: A direct sear followed by indirect finishing. The middle band exists because these cuts are thick enough that high heat alone risks overcooking the exterior before the center comes up, but not thick enough to justify the reverse sear's long, low-heat phase. Sear on the hot zone, flip once, then move to indirect heat to finish. As a rough baseline, a 1½-inch steak may need 6–7 minutes on the first side and 5–6 on the second for medium-rare. The thermometer, not the clock, makes the final call.
Over 1½ inches: Reverse sear. Start at 225°F until the steak reaches roughly 110°F internally, that's 45–60 minutes for a 1½-inch cut and 60–85 minutes for a 2-inch cut, then finish on a 450°F grill for about 4 minutes per side. One practical advantage: reverse-seared steaks need little to no rest afterward because the low-heat phase has already redistributed the juices. Do not use this method for steaks under 1½ inches; the low-and-slow phase overcooks a thinner cut before the sear even begins.
Step 4: Use a thermometer and pull at the right temperature
Color, firmness, and the finger-press test are all unreliable. Without a thermometer, whether meat is properly cooked is "very subjective," Blakeslee said. A digital instant-read thermometer is the non-negotiable piece of equipment in this guide; everything else gets more reliable once you have one.
Insert it from the side into the thickest part of the cut to reach the true center. Carryover cooking raises the steak's temperature by roughly 5–7°F after it leaves the grill, so pull it earlier than the target.
Rare: Pull from grill at ~105°F; final temp after rest: 120–125°F
Medium-rare: Pull from grill at ~115°F; final temp after rest: 130–135°F
Medium: Pull from grill at ~125°F; final temp after rest: 140–145°F
Medium-well: Pull from grill at ~135°F; final temp after rest: 150–155°F
Well-done: Pull from grill at ~145°F; final temp after rest: 160°F+
USDA minimum for safety: 145°F with a 3-minute rest
After pulling, rest the steak for at least half the total cook time, up to 10 minutes, before slicing, per Butcher BBQ. Cut too soon, and the juices run onto the cutting board instead of staying in the meat.
Step 5: Leave it alone while it cooks
The two most common interventions, flipping repeatedly and pressing down, both make the steak worse. The fix is straightforward: do less.
Roby's instruction is to wait until the steak releases cleanly from the grate before touching it. If it's sticking, the crust hasn't formed. Flip only once. Pressing down forces the juices out of the meat; those are the juices worth eating. Leave it alone.
Overcrowding is a subtler version of the same mistake. Each steak needs enough space to cook evenly; batch-cook if necessary. Andrés is direct on this: serve the first steaks hot while the next batch finishes rather than grilling everything simultaneously and serving it all lukewarm.
The full sequence:
Place the steak in the hot zone. Don't touch it.
Wait. The steak will release cleanly from the grate when the crust has formed. If it's sticking, it's not ready.
Flip once. Move to the indirect zone if needed to finish. Don't press down.
Pull at the correct temperature per the table above. Rest for up to 10 minutes, then slice.
Your grill-night sequence
Better steak usually comes from removing decisions, not adding steps. The improvements here are mostly subtractive: less guessing, less intervention, less sauce masking beef that doesn't need it.
The non-negotiables are thermometer, two-zone fire, correct pull temperature, and a single flip. Everything else is a method choice (direct vs. sear-to-indirect vs. reverse sear, determined by thickness) or a style preference (finishing salt vs. pre-seasoning, both valid with enough salt).
Checklist:
Season steak; if using a heavy rub, rest 20–30 minutes then pat dry
Pull from fridge up to 30 minutes before cooking
Preheat grill to 450°F; set up hot zone and cool zone before the steak goes on
Confirm thickness and select method: direct / sear-to-indirect / reverse sear
Cook on hot zone; don't flip until the steak releases cleanly
Flip once; move to indirect zone if needed to finish
Pull 5–7°F below target doneness; rest up to 10 minutes before slicing
Use a clean plate for the cooked steak, not the one that held raw meat
At-the-grill reference:
Under 1¼ inch: Use direct heat throughout; pull temp for medium-rare: ~115°F
1¼–1½ inches: Sear over direct heat, then finish over indirect heat; pull temp for medium-rare: ~115°F
Over 1½ inches: Reverse sear, starting at 225°F and finishing at 450°F; pull temp for medium-rare: ~115°F
Once the thermometer habit and two-zone setup are automatic, the remaining variables are cut selection and seasoning approach. Those are considerably more enjoyable problems than overcooked beef.


















Comments
Be the first, drop a comment!