



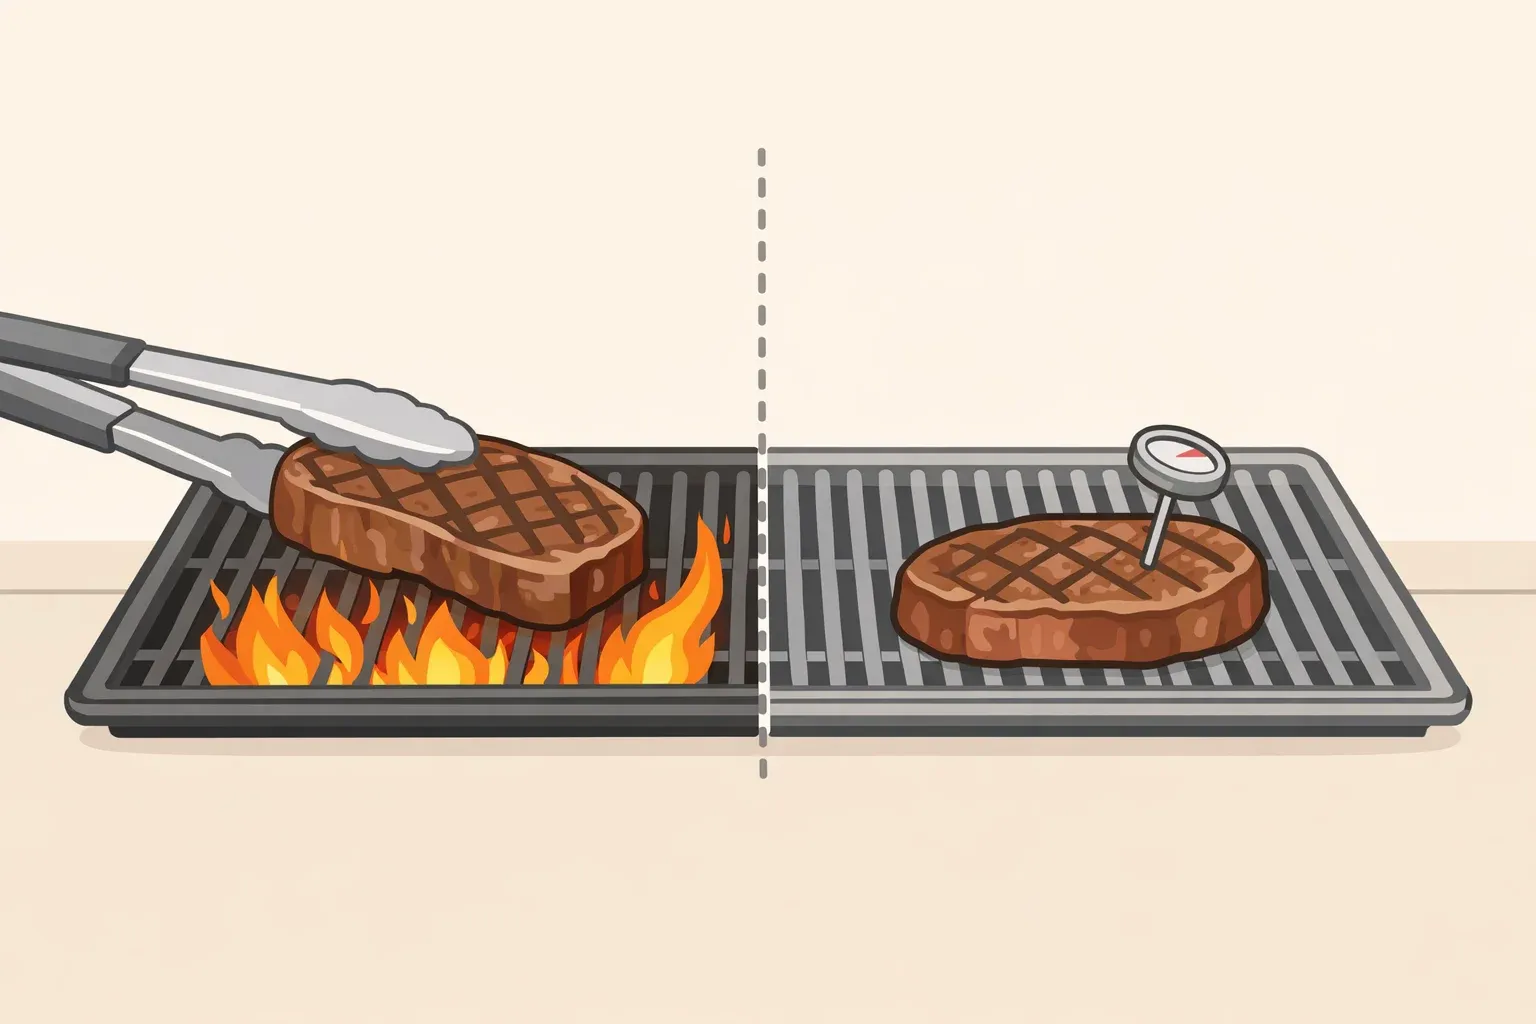
Thick steaks can burn on the outside before the center reaches the desired temperature. A two-zone grill solves that problem by pairing direct heat for browning with indirect heat for controlled cooking.
Instead of keeping the steak over the hottest part of the grill from beginning to end, sear it first and then move it away from the flames to finish. This method gives you more control over the crust, internal temperature, and flare-ups.
What you need
An instant-read thermometer is the most important tool for checking doneness. Color, firmness, and cooking time can offer clues, but none is as dependable as an internal-temperature reading.
You will also need:
A gas or charcoal grill large enough to create two heat zones
Fully thawed steaks between 1 and 2 inches thick
Kosher salt and black pepper
Paper towels
Long-handled tongs
A clean cutting board or serving plate
A wire rack and rimmed baking sheet for overnight dry-brining
Two-zone grilling works especially well for ribeye, strip, and sirloin steaks. The instructions below are designed for steaks approximately 1½ inches thick.
A 1-inch steak may finish over direct heat before it needs the indirect zone. For steaks around 2 inches thick, consider reverse searing: cook the steak gently over indirect heat, then finish it over direct heat.
Prepare the steak for better browning
Dry-brine when time allows
Salt the steak evenly, place it on a wire rack over a rimmed baking sheet, and refrigerate it uncovered overnight.
The uncovered rest dries the surface and gives the salt time to season the meat. A dry surface browns faster because the grill does not have to evaporate as much moisture before a crust can form.
Short on time? Season the steak before grilling and pat the surface thoroughly dry with paper towels.
When grilling several steaks, group them by thickness and check each one separately with the thermometer. Thinner steaks will usually reach the target temperature first.
Handle raw steak safely
Keep raw steak refrigerated until you are ready to cook it. Use clean plates and utensils for cooked steak, and do not return cooked meat to a surface that held raw meat unless it has been thoroughly washed.
The USDA's grilling and food-safety guidance recommends keeping raw meat separate from cooked food to prevent cross-contamination.
How to grill steak with two heat zones
Step 1: Set up and preheat both zones
A two-zone grill has one side positioned over direct heat and another that receives heat indirectly. Weber's guide to direct, indirect, and two-zone grilling recommends the setup for thicker cuts that benefit from both high-heat searing and gentler cooking.
For a gas grill: Preheat the grill with all burners on high. Once it is hot, leave the burners on one side at high or medium-high and turn the burners on the other side off.
For a charcoal grill: Arrange the lit coals on one side of the grill and leave the other side empty. Position the lid vent over the indirect side when the grill design allows. This encourages heat and smoke to travel across the steak before leaving the grill.
Close the lid and let the grill and grates preheat thoroughly before adding the steak. A grill that has not fully preheated browns meat slowly and may encourage sticking.
Step 2: Sear over direct heat
Place the steaks over direct heat and sear the first side for about 2 to 3 minutes. Turn the steaks and sear the second side.
Avoid repeatedly moving the steaks before their surfaces have browned. If a steak resists when you try to turn it, wait about 30 seconds and test it again rather than pulling it from the grate.
Look for a deep-brown surface rather than relying only on the clock. Once both sides have browned, move the steaks to the indirect side.
If the surface begins to blacken, move the steak away from direct heat immediately. If dripping fat causes flames, keep the steak over the indirect side until the flare-up subsides. Do not press the steak or spray water onto the grill.
Step 3: Finish over indirect heat
Close the lid after moving the steaks to the indirect side. Begin checking their internal temperature after several minutes.
The remaining cooking time will vary with:
Steak thickness
Grill temperature
Whether the steak contains a bone
The steak's starting temperature
The desired level of doneness
Insert the thermometer through the side of the steak into its thickest section. Move the probe slowly toward the center and use the lowest stable reading, avoiding bone and large pockets of fat.
ThermoWorks recommends finding the steak's coolest internal temperature rather than relying on a single reading near the surface.
Cook according to temperature rather than time. Begin checking several degrees before the desired final temperature. A steak may continue heating after it leaves the grill, but the amount of carryover cooking varies with thickness, grill heat, and resting conditions.
Use these culinary doneness ranges as approximate final temperatures:
Steak doneness temperatures
Use these culinary doneness ranges as approximate final temperatures:
Rare: 120–130°F, with a cool to warm red center.
Medium-rare: 130–135°F, with a warm red center.
Medium: 140–145°F, with a pink center.
Medium-well: 150–155°F, with a slightly pink center.
Well-done: 160°F or higher, with little or no pink.
Begin checking the steak several degrees below the desired final range rather than relying on a fixed pull-temperature chart.
For food safety, the USDA recommends cooking whole beef steaks to 145°F followed by a three-minute rest. Medium-rare temperatures fall below that federal recommendation.
Step 4: Rest and slice the steak
Transfer the steak to a clean cutting board and rest it for about five minutes. A particularly thick steak may need closer to 10 minutes.
Tent it loosely with foil only when necessary. Covering it tightly can trap steam and soften the crust.
Check the temperature again before slicing when precise doneness is important. Some liquid on the cutting board is normal and does not necessarily mean the steak rested incorrectly.
When the grain is visible, slice across the muscle fibers rather than parallel to them. Shortening the fibers makes the steak easier to chew.
Fix common grilling problems
The steak is browning too quickly
Move it to the indirect side and close the lid. If the second side still needs color, return it briefly to direct heat near the end.
The steak sticks to the grate
Wait about 30 seconds and try again. If it still sticks, use tongs or a thin spatula to lift it gently rather than tearing the surface.
Sticking may also indicate that the grill was not fully preheated or the grates were not clean.
The exterior is pale
Pat the steak dry before grilling and make sure the direct side is thoroughly heated. A damp surface or underheated grill slows browning.
The thermometer reading changes
Check several spots near the center. The temperature will often be higher near the exterior and lower in the center. Use the lowest stable reading as your guide.
The steak is done earlier than expected
Move it off the heat. Do not leave it on the indirect side simply because the estimated cooking time has not elapsed.
Thickness and grill temperature affect cooking time more than a minutes-per-side formula.
Try reverse searing thicker steaks
For steaks around 2 inches thick, reverse the order of the method. Start the steak over indirect heat and cook it until it is several degrees below the desired final temperature. Move it over direct heat and sear both sides briefly.
The slower first stage allows the center to heat more evenly before the crust develops. Check the temperature frequently during the final sear to avoid overshooting the target.
Serve or store the steak safely
Serve the steak soon after it rests for the best crust and doneness. A hot grill or oven can continue cooking a finished steak even when it is positioned away from direct heat.
When cooked meat must be held, keep it at 140°F or warmer and monitor its internal temperature. Refrigerate steak within two hours, or within one hour when the outdoor temperature is above 90°F, following USDA guidance for the food-safety danger zone.
Use direct heat to build the crust, indirect heat to control the center, and a thermometer to determine when the steak is done.

















Comments
Be the first, drop a comment!