



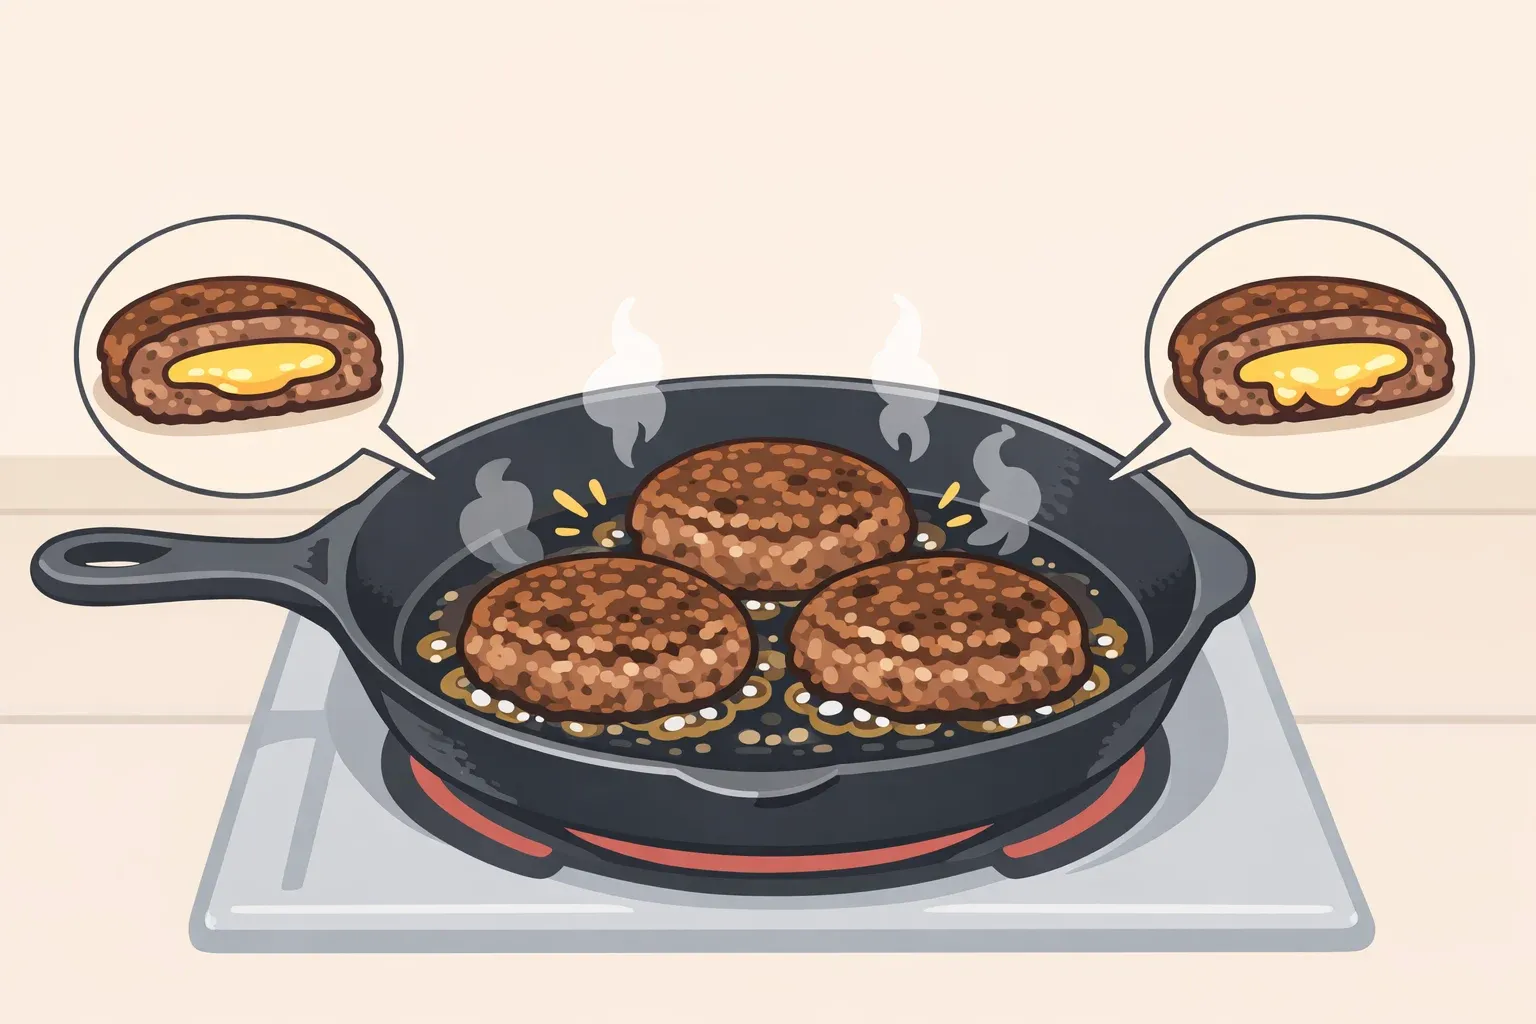
How to Make Juicy Lucy Burgers Without Leaks or Undercooking
If you want to know how to make Juicy Lucy burgers at home, the hard part isn't stuffing cheese into beef. It's keeping the seal intact long enough for the center to melt and the meat to cook through safely. This guide solves the two failures that ruin it most often: a blown seal that leaks cheese into the pan, and a center that can look done before it actually is.
By the end, you'll have the exact patty dimensions, cheese selection, sealing technique, and temperature endpoint that make this work consistently.
What you need before starting:
- 80/20 ground beef the fat content keeps thin patties cohesive without overworking them
- A kitchen scale 2-oz portions per disc; eyeballing produces uneven seals
- An instant-read thermometer not optional (the safety section explains why)
- A cast-iron skillet
- Cheese: American, shredded cheddar, or a finely crumbled soft cheese details in Step 3
- Parchment or wax paper for flattening patties without sticking
How to make Juicy Lucy burgers: the full method
The classic version is 80/20 beef and American cheese. Start here. It's the most forgiving combination, and the easiest to read for doneness. Once this is solid, the method transfers cleanly to any filling.
Step 1: Portion and flatten the patties.
Weigh two 2-oz portions of ground beef per burger. Press each into a disc roughly 1/4 inch thick genuinely thin, thinner than most people produce by hand. Two discs at that weight produce a quarter-pound assembled burger once sealed (ThermoWorks). Press between sheets of parchment to get consistent thickness without overworking the meat. Handle it as little as possible.
Step 2: Pre-cook any non-cheese fillings.
If adding vegetables onions, peppers, mushrooms cook them completely before they go inside. The thin patty layers cook in roughly 2-3 minutes per side, and raw vegetables won't soften in that window. They also release steam as they cook under pressure, which is exactly what blows the seal open (ThermoWorks). Caramelize onions, sauté mushrooms, let them cool slightly, then stuff.
Step 3: Choose cheese that will actually melt.
American cheese is the classic choice it reaches a fully liquid consistency more readily than most alternatives. Shredded cheese is a close second; the greater exposed surface area melts faster than a single thick slice of a harder cheese (ThermoWorks). Blue cheese and feta work well if crumbled finely; they won't fully liquefy but will soften into a molten consistency. Avoid firm, low-moisture cheeses in thick slices.
The 5-8 Club, one of the two Minneapolis bars that claim to have invented the cheese-stuffed burger, offers four cheeses on their menu American, blue, pepper jack, and Swiss and tags patties mid-cook with colored toothpicks corresponding to the cheese inside, so grill staff never need to cut into a burger to check (Wikipedia, 5-8 Club). Making multiple burgers with different fillings? That system is worth stealing.
Step 4: Fill, seal, and verify the edge.
Place cheese in the center of half the patty discs, leaving a clean 1/2-inch border around the entire perimeter. Top with a second disc and pinch the edge firmly, working all the way around at least twice. One gap is where the filling escapes into the pan. If any section of the seam feels thin or loose, press again. A slightly ugly patty with a solid seal outperforms a clean-looking one that leaks (ThermoWorks).
Don't overfill. A larger cheese pocket sounds better until the seal fails.
Step 5: Sear in cast iron.
Preheat a cast-iron skillet over high heat until it reaches 500-550°F before the burgers go in. Cast iron holds heat evenly under the cold mass of the patty, sustaining the surface temperature needed to develop a proper crust without steaming the meat (ThermoWorks). The Maillard reaction the browning that builds crust flavor becomes very active at 350°F but requires a hotter pan surface to happen quickly. Cook approximately 2-3 minutes per side, then check temperature.
Step 6: Pull at 155°F, rest for 5 minutes.
Remove the burgers at 155°F. Carryover cooking typically adds 3-5°F, carrying them to the 160°F target (ThermoWorks). Insert the thermometer from the side of the patty, not the top thin patties don't have enough vertical depth for a top-down reading to reach the true center (ThermoWorks).
Rest 5 minutes. Dress the bun while you wait. Then warn anyone at the table: the cheese core stays significantly hotter than the surrounding meat even after resting. The first bite breaks the seal and releases near-boiling liquid cheese. Bite toward the center, not the edge.
A properly made Juicy Lucy, cut in half, shows a fully melted cheese core surrounded by cooked meat no dry cavities, no unmelted chunks. The meat immediately surrounding the cheese pocket will look noticeably more moist than the outer ring. That's the benchmark.
Why sight alone won't tell you when it's done
The standard cues for cooking burgers browning, juices running clear break down entirely with a stuffed burger. The molten cheese core affects how the patty looks and feels before the meat is necessarily safe. You cannot cook this burger by sight alone.
USDA guidance requires all ground beef to reach 160°F, confirmed with a thermometer (ThermoWorks). Color is actively unreliable: FSIS research found that more than 25% of fresh ground beef patties turned fully brown before reaching a safe temperature, and some lean beef can remain visibly pink well above 160°F (FSIS). A Juicy Lucy compounds this the heat radiating outward from the cheese pocket warms the surrounding meat unevenly, making the interior look and feel more cooked than it is. The thermometer isn't a formality; it's the only tool that actually measures what's happening at the center.
One distinction worth making: medium-rare stuffed burgers are possible, but only if you grind the beef yourself from whole cuts immediately before cooking. Store-bought ground beef is blended from multiple sources, which distributes any surface bacteria throughout the entire mass (FSIS). For pre-ground beef which covers the vast majority of home cooks 160°F is the correct target, not a conservative hedge (ThermoWorks).
The Minnesota original: two bars, one disputed origin
The Juicy Lucy traces to 1950s Minneapolis, where two bars on Cedar Avenue Matt's Bar and the 5-8 Club, about three miles apart have each claimed invention ever since (Wikipedia, Jucy Lucy). Matt's account is more detailed: one version holds that a customer bit into the burger in 1954 and said "Oooh, that's one juicy lucy," producing both the name and what appears to be an accidental misspelling that Matt's kept on purpose. The 5-8 Club, which opened as a speakeasy in 1928, claims the same decade but offers no founding anecdote (Wikipedia, 5-8 Club).
The dispute long since crossed from historical into cultural. Staff at the 5-8 Club wear shirts reading "If it's spelled right, it's done right." Matt's fires back: "If it is spelled correctly, you are eating a shameless rip-off" (Wikipedia, Jucy Lucy). Neither bar has primary-source documentation. What they do have is a burger that Thrillist called "an important milestone in the evolution of hamburgers" in 2018, and that drew President Barack Obama to Matt's in 2014, prompting the 5-8 Club to publicly offer him one of theirs. In the Twin Cities, "authentic" describes a technique, not a specific address.
Variations: same method, different fillings
Once the baseline works thin patties, solid seal, 155°F pull temperature the same approach handles any filling that follows two constraints: soft or shredded cheese, and pre-cooked vegetables. The rules don't change with the filling, and neither does the thermometer.
A few combinations worth trying, all drawn from the same technique principles (ThermoWorks):
- Blue cheese and hot sauce
- Smoked gouda, barbecue sauce, and caramelized onions
- Pepper jack, roasted bell peppers, and caramelized onions
- Feta, lemon juice, and oregano
- Spinach and Swiss cheese
Keep the filling modest in each case. The same overfilling failure that wrecks the classic version will wreck any variation.
Swiss melts more slowly than American but pairs well with stronger accompaniments like caramelized onion or horseradish. The 5-8 Club's menu covers American, blue, pepper jack, and Swiss a range that maps cleanly to the cheese guidance above (Wikipedia, 5-8 Club).
If something went wrong
The three variables that determine success are patty thickness, cheese selection, and seal integrity. When one of them slips, here's what you'll see:
- Cheese leaked into the pan: The seal had a gap. Press slower and with more pressure on the next attempt, working the entire perimeter twice.
- Cheese didn't fully melt: Either the cheese type was wrong thick slices of a hard cheese or the pan wasn't at temperature before the burgers went in.
- Exterior overcooked before the center was done: The patties were too thick, overfilled, or both.
All three are fixable on the next attempt with the same ingredients (ThermoWorks). The gap between a failed first attempt and a solid second one is usually just one of these variables.


















Comments
Be the first, drop a comment!